Using State Machines in Vue.js with XState
While state machines used to be an obscure model for the front-end world, it has gained quite some traction lately, mostly thanks to XState.
XState is a JavaScript state machine implementation created by Microsoft engineer David Khourshid. I met David at dotCSS 2019, where he talked about crafting stateful styles using finite state machines.
During his talk, David asked: “is there a better way to model state for dynamic UIs?” After all, state is at the center of what we, front-end engineers, deal with every day. Think of when you set an app to dark mode, when you load the latest purchases from a given user, or when you momentarily disable a button during data fetching: all you do is managing state. User flows are transitions between UI states, caused by events.
There are many ways to represent state in modern web applications. In Vue.js, you can use local state (encapsulated within components) or global state (using a state management library like Vuex). Wherever you put your state, it usually works the same way: you represent it with properties that you can change, and you use these properties to determine view logic.
 Password Modal with Finite State Machine by David Khourshid
Think, for instance, of a password-protected resource. You can input a password and submit it. While it’s being validated on the server, the UI goes in a loading state, and you can’t interact with it. If the password is invalid, the UI goes in an error state, maybe showing an error message and outlining the input in red, but lets you try again. Finally, when you submit the right password, the UI goes into a success state and moves on to the unlocked resource.
All these scenarios can be solved with event listeners and if statements. In a Vue.js application, you could model this with the data object and computed properties, which would change based on user events and Promise resolutions. Yet, as the application would grow, this could quickly turn into a tangled mess: new conditions, new events, new corner cases, and before you know it, you end up with contradictory instructions that set your view in an inconsistent state. This is what state machines and XState attempt at solving.
State machines are a tried and tested mathematical model, invented long before JavaScript. They let you model the behavior of a system that can be in only one state at any given time (not several, not none). There’s a finite number of possible states, which are triggered by a finite number of possible events. Going from a state to another is called a transition.
Instead of defining imperative UI flows, and lose track of their logic, state machines make them first-class citizens by letting you model them declaratively. They’re the closest thing to an actual flowchart, which is how a product manager or a UI designer would likely design the experience of a product.
State machines in Vue
XState works within any JavaScript and TypeScript project, including Vue.
We’ll build a simple Markdown editor, which renders a live preview. The live preview displays the HTML render, can switch to the HTML code, or be collapsed.
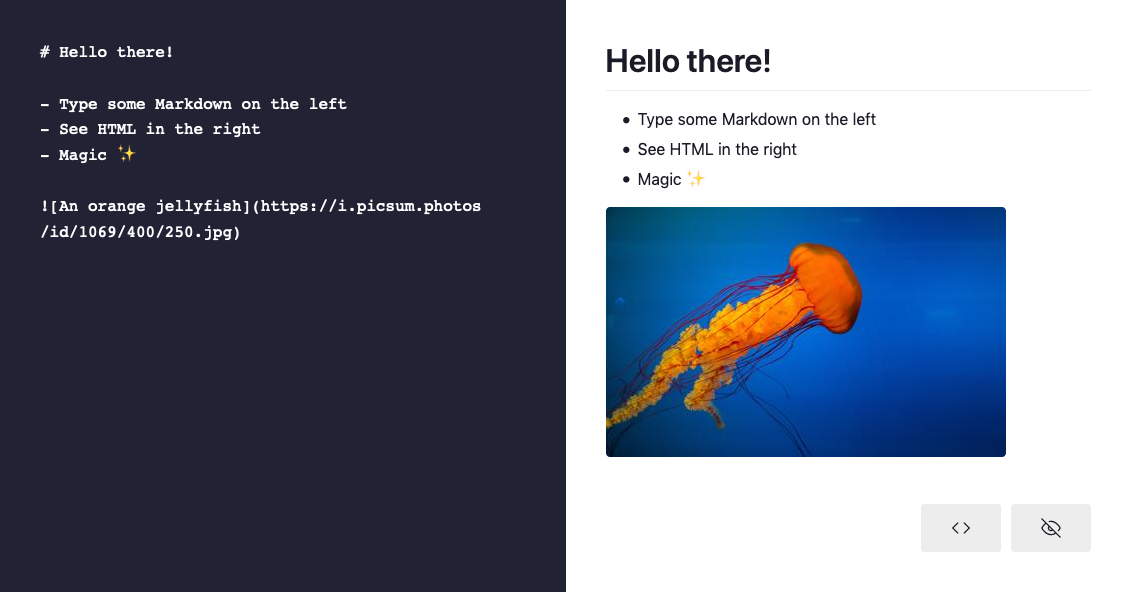 Markdown Editor built with Vue.js and XState
Let’s create a brand new project with Vue CLI, with the default settings.
vue create markdown-editor-vue-xstateInstall the necessary dependencies: XState, as well as markdown-it and indent.js to render the Markdown.
cd markdown-editor-vue-xstate
yarn add xstate markdown-it indent.js
Great! Let’s quickly bootstrap the application to have a working prototype.
Open the App.vue file, and replace the boilerplate with the following code:
<template>
<div id="app">
<textarea v-model="content" />
<div v-html="rendered" />
<pre>{{ raw }}</pre>
</div>
</template>
<script>
import MarkdownIt from "markdown-it";
import { indent } from "indent.js";
const md = new MarkdownIt();
export default {
name: "App",
data() {
return {
content: "# Hello there!\n\n- Type some Markdown on the left\n- See HTML in the right\n- Magic\n\n"
};
},
computed: {
rendered() {
return md.render(this.content);
},
raw() {
return indent.html(this.rendered, {
tabString: " "
});
}
}
};
</script>Great, time to bring XState. We’re currently displaying the rendered Markdown as interpreted HTML, and the raw HTML. What about toggling between both? Or collapse the render to extend the editor in full screen?
We can use a state machine to model this.
<script>
import { createMachine, interpret } from "xstate";

const toggleMachine = createMachine({
  id: "toggle",
  initial: "rendered",
  states: {
    rendered: {
      on: { SWITCH: "raw" }
    },
    raw: {
      on: { SWITCH: "rendered" }
    }
  }
});

export default {
  data() {
    return {
      // …
      toggleService: interpret(toggleMachine),
      current: toggleMachine.initialState
    };
  },
  created() {
    this.toggleService
      .onTransition(state => {
        this.current = state;
      })
      .start();
  }
};
</script>
Let’s analyze this code. First, we import createMachine and interpret. createMachine is a factory function that lets us create state machines, while interpret allows us to parse and execute it in a runtime environment.
An interpreted, running instance of a statechart is a service, which we add to our data object as the toggleService property. When we start the application, we set a listener for transitions with the onTransition method, which we use to assign the new state on a current property, which we initialize to the initial state of the machine. In other words, every time we’ll dispatch an event to the state machine (resulting in a transition), we’ll also update our reactive Vue state with the state of the machine.
Now let’s look at the machine itself.
const toggleMachine = createMachine({
  id: "toggle",
  initial: "rendered",
  states: {
    rendered: {
      on: { SWITCH: "raw" }
    },
    raw: {
      on: { SWITCH: "rendered" }
    }
  }
});
Our machine has two states; rendered, which corresponds to rendered Markdown, and raw, which represents the raw HTML output. Each state node has an on property, containing a mapping of all possible transitions. When receiving the SWITCH event while the machine is on the rendered state, the machine transitions to raw, and vice versa.
We also set an initial state, rendered. A state machine must always have a state; it can’t be undefined.
This creates our first user flow and starts defining the application state that we can use it in our template.
<template>
  <div id="app">
    <textarea v-model="content" />
    <div
      v-show="current.matches('rendered')"
      v-html="rendered"
    />
    <pre
      v-show="current.matches('raw')"
    >
      {{ raw }}
    </pre>
  </div>
</template>
Remember, we’re exposing our service on the current reactive property. This allows us to use the matches method to define view logic based on the current state.
In our case, we’re showing the rendered Markdown when the state is rendered, and the raw HTML when the state is raw. Let’s add a button to transition between states.
<template>
  <div id="app">
    <!-- … -->
    <button @click="send('SWITCH')">
      {{ current.matches('raw') ? 'Show rendered Markdown' : 'Show HTML code' }}
    </button>
  </div>
</template>

<script>
export default {
  // …
  methods: {
    send(event) {
      this.toggleService.send(event);
    }
  }
}
</script>
Now, when clicking the button, we’ll send a SWITCH event to the service. When the current state is rendered, it transitions to raw, and vice versa. As a result, the UI toggles between rendered Markdown and raw HTML.
Great! What about creating a focus mode now, and allowing the user to fully collapse the preview? This is where nested states and statecharts come into play.
Statecharts
Statecharts are extended state machines. They introduce additional useful concepts, including nested states. This allows us to compose states into logical groups.
In our case, we want to implement a focus mode where we can collapse the preview. This means that, in addition to being either rendered or raw, the preview can also be visible or hidden. Yet, these two new states aren’t independent of the first two: they condition them. The preview can only be rendered or raw if it was first visible.
This is what nested states allow us to do; encapsulate a set of states within another. Let’s add our new visible and hidden states at the root of the machine, and nest our existing rendered and raw within visible.
const toggleMachine = createMachine({
  id: "toggle",
  initial: "visible",
  states: {
    visible: {
      on: {
        TOGGLE: "hidden"
      },
      initial: "rendered",
      states: {
        rendered: {
          on: {
            SWITCH: "raw"
          }
        },
        raw: {
          on: {
            SWITCH: "rendered"
          }
        }
      }
    },
    hidden: {
      on: {
        TOGGLE: "visible"
      }
    }
  }
});
We’ve also created a new TOGGLE event which switches between visible and hidden. The visible state automatically moves on to its initial child state, rendered.
“Wait… I thought state machines could only be in one state at a time!”
Indeed, state machines are always in a single state at a time. Statecharts don’t change that; yet, they introduce the concept of composite states. In our case, the visible state is a composite state, composed of sub-states. In XState, this means that our machine can be in state hidden, visible.rendered, and visible.raw.
At this stage, it might become hard to visualize the entire flow. Fortunately, XState provides a nifty tool: the visualizer. This lets you paste any XState state machine, and instantly get an interactive visualization.
Here, we have a clear vision of our user flow. We know what we can and can’t do, when we can do it, and in what state it results. You can use such a tool to debug your statecharts, pair program with fellow developers, and communicate with designers and product managers.
We can now use the new states in our template to implement the focus mode.
<template>
  <div id="app">
    <textarea v-model="content" />
    <div
      v-show="current.matches('visible.rendered')"
      v-html="rendered"
    />
    <pre
      v-show="current.matches('visible.raw')"
    >
      {{ raw }}
    </pre>
    <button @click="send('SWITCH')">
      {{ current.matches('visible.raw') ? 'Show rendered Markdown' : 'Show HTML code' }}
    </button>
    <button @click="send('TOGGLE')">
      {{ current.matches('hidden') ? 'Show preview' : 'Hide preview' }}
    </button>
  </div>
</template>
Neat! We can now entirely toggle the preview.
Now, if you’re testing your application in the browser, you’ll notice that when you do, you always go back to the initial rendered state, even though you switched it to raw before hiding the preview. Better user experience would be to automatically go back to the latest substate when transitioning to visible. Fortunately, statecharts let us manage this with history nodes.
History
A history state node is a particular node that, when you reach it, tells the machine to go to the latest state value of that region. You can have shallow history nodes (default), which save only the top-level history value, and deep history nodes, which save the entire nested hierarchy.
History is a compelling feature that allows us to memorize in which state we left the preview and resume it whenever we make it visible. Let’s add it to our state machine.
const toggleMachine = createMachine({
  // …
  states: {
    visible: {
      // …
      states: {
        // …
        memo: {
          type: "history"
        }
      }
    },
    hidden: {
      on: {
        TOGGLE: "visible.memo"
      }
    }
  }
});
Now, whenever the machine receives a TOGGLE event while hidden, it resumes the latest substate of visible.
Our application works well, but it lacks an important feature: state persistence. When you’re using a tool often, it’s pleasant to have it “remember” our preferences. XState lets us achieve that with state resolution.
Persisting and rehydrating state
An XState state is a plain, serializable object literal, which means we can persist it as JSON in a web storage system such as LocalStorage and resume it when the user comes back to the application.
First, let’s save our state every time a transition happens. It ensures we never “miss” a state change.
export default {
  // …
  created() {
    this.toggleService
      .onTransition(state => {
        this.current = state;

        try {
          const state = JSON.stringify(this.current)
          localStorage.setItem("state", state);
        } catch () {
          console.error("Local storage is unavailable.");
        }
      })
      .start();
  },
};
If the LocalStorage is available (not full, and the browser is not in incognito mode), we persist the current state of the machine as JSON inside it.
We can now use it to hydrate the machine when we start it.
import { createMachine, State, interpret } from 'xstate';

// …

const savedState = JSON.parse(localStorage.getItem("state"));
const previousState = State.create(savedState || toggleMachine.initialState);
const resolvedState = toggleMachine.resolveState(previousState);

// …

export default {
  // …
  created() {
    this.toggleService
      // …
      .start(resolvedState);
  },
};
If there’s nothing in the LocalStorage, we use the initial state of the machine. Otherwise, we use the resolved persisted state.
If you try this in your browser, change the state, then refresh, you’ll start from where you left off.
Note that state persistence and data persistence are two different things. We’re currently saving our application state, not the data (the typed Markdown) because this is out of the scope of a state machine. Data state is, by definition, infinite; it doesn’t belong to a finite state machine.
To persist data automatically, you can use Vue watchers to observe the content data property, and save it to the LocalStorage when it changes. Remember that such operations are slow and synchronous; I recommend you debounce them.
Is it worth it?
State machines model the concept of state, and gives it a framework to properly think about it. It’s a shift of mental model which brings many advantages, including the reliability of decades of mathematical formalism. Additionally, it lets you look at state as a self-contained flow chart, which makes it easier to visualize and share with non-developers.
You probably don’t need state machines in every project, especially those with minimal state, or when it doesn’t change much. However, they may have a clear advantage over other kinds of state management libraries, if you need such a mechanism in your project. XState has many more great features to discover, we barely scratched the surface here.
If XState in Vue looks like too much boilerplate, know that it also ships Vue bindings for the Vue 3 Composition API. You can use this flavor to create state machines in your Vue applications with terser, more functional code.
You can also find the final code from this tutorial on GitHub.