Setup For an Open Source JavaScript Project
When I started my career, my mentor told me:
“A good developer is a lazy developer. Don’t waste time on repetitive tasks, instead spend it on building automated processes. The computer works for you, and it will always be faster than you.”
This was back in 2010, and the toolset we had at our disposal was more scarce than it is today. Yet, this piece of advice has stuck with me ever since. From executable scripts to Yeoman configs, IFTTT setups and Automator workflows, not to mention the slew of apps I use to assist my every move on the computer, I see automation as a game and take a lot of satisfaction in it.

JavaScript has exploded since then, but with it has grown complexity. We used to add an external JavaScript file to an HTML page and call it a day, but there’s much more to building a web project now than just coding. We also have more tools than we can use to unload repetitive tasks, so finding your way through it all can be overwhelming.
To sort this out, I decided to show you the detailed setup for a real-life project: my latest open source project, Dinero.js.
Disclaimer: this isn’t a tutorial on how to make an open source library, but rather an overview of what I use, how, and why. For a thorough step-by-step guide, I recommend the egghead.io course How to Write an Open Source JavaScript Library by Kent C. Dodds.
Dependency management
npm & Yarn
Before the modern times, we used to download dependencies by hand and load them globally in pages. This made things easy but led to a number of problems: duplicate libraries, heavy repositories, difficult version management, etc.
Fortunately, we now have a robust and trust-worthy front-end dependency manager: npm. If you come from PHP, you can see npm like Composer and Packagist put together. It provides the richest front-end repository out there, and a great command-line interface to handle dependencies.
Many people (including me) prefer using Yarn though: a faster CLI that integrates a powerful cache system, parallelizes downloads and provides an offline mode. Now Yarn is only a layer on top of the npm repository: it browses npm packages, but allows you to use their tool instead.
Coding style & conventions
EditorConfig
Imagine you’re working on several projects, all of which have different conventions. On this library you chose two-space indentation, but this other open source project you contribute to prefers four-space long tabs. Are you going to manually reconfigure your editor every time you switch?
EditorConfig is a configuration file that lives in your project and defines editor settings. Every time you work on a project that has an .editorconfig file, your editor will conform to its rules.
Most editors can parse .editorconfig files, but if it’s not the case for yours you can still download a plugin.
Prettier
One of the tools I’m the most grateful for is Prettier. I dig it so much that I have it as an npm script in my project and as a code editor plugin. That’s how deep my love is.
Prettier solves the problem of arguing over coding style and wasting time in code review. No more heated discussions around simple vs. double quotes. No more rejected PRs because you forgot a space before an if parenthesis. And above all things, no more wasted time formatting code by hand. Prettier is opinionated, so you’ll get limited room for customizing the default rules. And that’s for the best: that’s not what you should spend your precious time on.
ESLint
Like with grammar and spelling, your code isn’t immune to typos. Also, it’s not unlikely to accidentally add code that may introduce bugs, like globals or unwanted type coercion.
This is what ESLint takes care of. It will not rewrite your file like Prettier does, but you’ll get warnings in the terminal.
There is some common territory between ESLint and Prettier, which is why I recommend that:
- You run Prettier first, then ESLint.
- You use a tool that ensures they don’t conflict with one another, like eslint-config-prettier.
Commitizen & cz-conventional-changelog
You’re probably starting to see a pattern here: yes, I’m big into conventions. I’d rather trust a convention and focus on my job than fall into the rabbit hole of bikeshedding, and commit messages fall under that category. Now the idea behind conventional commit messages isn’t only to make pretty commits, it’s about automating a large part of your CI workflow.
When you maintain software, there are some tedious tasks that need to be taken care of. Among them are keeping a changelog up to date and versioning the project.
Maintaining a changelog by hand is a pain. You have to check every commit since the latest release, filter out what’s doesn’t concern the user (changes to the build system, non-breaking refactors, etc.), find out what effective changes were made and write it down in a human-readable way.
Same goes for the version. Depending on the changes, you need to resolve what the next version is. No matter how well you think you know semver, it can be tedious to increment the version by hand. Human error easily leads to incorrect versions, and this can be a big problem for users.
This is what Commitizen & cz-conventional-changelog take off your plate. Instead of committing the usual way, you run a script that asks you questions. It will then commit for you with a properly formatted message that follows the Angular Git Commit Guidelines. Later on, when you deploy with semantic-release, those commit messages will be used to generate the changelog and resolve the new version number. Automatically. Nice, right?
lint-staged
If you’re working in a team, one of the best ways to ensure code quality is doing code reviews. It’s paramount that code going to production goes under at least a second pair of eyes.
Now because they’re time-consuming, it’s important that code reviews observe a few rules. Among those, review time shouldn’t be used to spot linting errors.
All formatting and linting should happen before committing. It shouldn’t distract the reviewer from doing their job, and it shouldn’t break the build. This is why lint-staged is so useful: every time you commit, it will act as a pre-commit hook and run a script of your choosing.
In Dinero.js, here’s what’s my lint-staged configuration looks like:
{
  "lint-staged": {
    "*.js": ["npm run lint!", "git add"]
  }
}
The npm run lint! command sequentially triggers two other scripts: npm run format (Prettier), then npm run lint (ESLint). Every time I try to commit a JavaScript file, Prettier will reformat it. Then, ESLint will perform a scan: if it passes, the commit will go through. Otherwise, ESLint will throw an error and the commit will be aborted.
Documentation
JSDoc
Documentation should live as close as possible from the code it describes. This is a good way to keep it up to date and guarantee its exhaustiveness. A great implementation of this idea is doc blocking: using formatted comments to document code, which can then automatically generate a documentation website. In JavaScript, the most popular documentation generator is JSDoc.
With JSDoc, all you need to do is add a comment with specific tags and descriptions above every significative part of the code (a function, a module, etc.)
{
  /**
   * Returns the currency.
   *
   * @example
   * // returns 'EUR'
   * Dinero({ currency: 'EUR' }).getCurrency()
   *
   * @return {String}
   */
  getCurrency() {
    return currency
  }
}
This doc block has a description, one example and a typed return value.
Once written, doc blocks can be turned into a documentation website with a single command. You can use any pre-existing JSDoc template to generate your website or create yours.
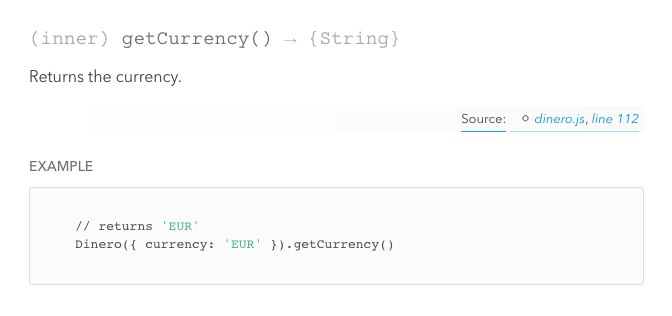 Here’s how the doc block for
 Dinero.getCurrency looks like once compiled into a website.
Why not ESDoc?
The younger kid on the block, ESDoc, takes a different approach than JSDoc. Among other things, ESDoc was designed to work well with ES6 classes, and concrete code in general. The downside is that it doesn’t support factory functions. Factory functions are dynamic object generators, a behavior that ESDoc doesn’t cover. If you try to document a factory with ESDoc, the generated documentation will come back empty.
In my case, factories are the building blocks of Dinero.js, which explains my choice.
If your project uses the ES6 class syntax, ESDoc will meet all your needs. Else, go with JSDoc: it supports all ES6 features, as well as “older” patterns like factory functions and the original syntax for constructors.
Algolia DocSearch
You may have written your documentation with care and presented it in a pretty website, at the end of the day, what matters is for users to find what they need as quickly as possible. Nobody likes to break their flow for too long to go find something they need. It’s no surprise StackOverflow is so popular: people need answers to their questions, and they need it fast.
Algolia is the best search service out there. Their (free) DocSearch solution lets you create an excellent documentation experience for your users. DocSearch is an on-demand service: once your docs are ready, send them a URL and you’ll get a code snippet to add to your website.
Tests
Mocha & Chai
Unit testing is crucial. If you can only do one thing for code quality, forget linting, forget formatting, forget code reviews and write unit tests.
Unit testing forces you to build modular, single-responsibility code and ensures you don’t break things that used to work fine. It’s a crucial part of continuous integration. If you’re serious about what you’re building, you should 100% unit test it.
Now if you’re just starting out, unit testing may seem a bit scary. The good news is they don’t have to be: thanks to tools like Mocha and Chai, writing tests comes really close to being fun.
Here’s an excerpt from my unit tests for Dinero.js:
import chai from 'chai'
import Dinero from '../../src/dinero'

const expect = chai.expect

describe('Dinero', () => {
  describe('#getAmount()', () => {
    it('should return the right amount as a number', () => {
      expect(Dinero({ amount: 500 }).getAmount()).to.equal(500)
    })
    it('should return the default amount as a number when no amount is specified', () => {
      expect(Dinero().getAmount()).to.equal(0)
    })
  })
})
This JavaScript file, called a “spec”, uses the Mocha framework and the Chai assertion library. The public API is built to look like actual English sentences: even non-technical people can read the spec files and understand what’s going on. This makes it easy for new contributors, because the learning curve is almost non-existent.
Tests using Mocha and Chai are natively run with Node.js, which means it expects CommonJS modules for the spec and source files. But thanks to Babel, we don’t have to write CJS if we don’t want to: we can still use ES modules and transpile them on the fly as we run tests! This is how I’m able to include modules with import instead of require and still have fully working tests.
Istanbul & Coveralls
Writing unit tests is great, but as your project scales, you may lose track of what needs to be tested. It’s not your fault: you’re busy building something and there are a lot of things to remember. That’s why we automate tasks, to assist ourselves and help us remember things we forget. Code coverage monitors your code on a regular basis (usually every time you run tests) and gives you a report of the amount of code that’s covered by unit tests.
Istanbul is a code coverage tool. In Dinero.js I use nyc, its command-line interface, to generate reports.
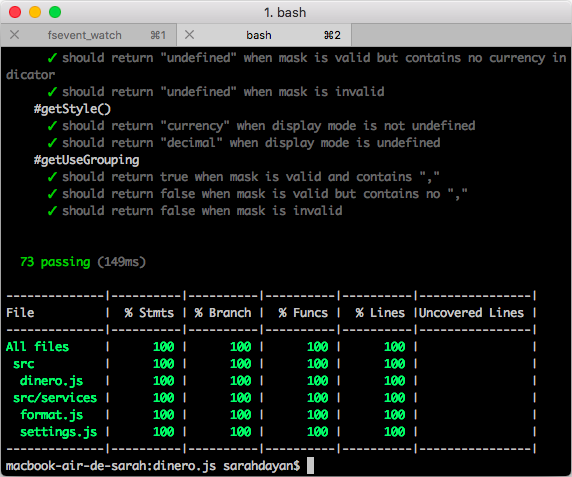 An Istanbul report once unit tests are done.
Istanbul generates reports in all kinds of formats: terminal output, HTML, but also LCOV. This one is particularly useful when used with online services like Coveralls. Every time Travis CI runs a build, it executes tests and nyc generates an LCOV file. It’s then sent to Coveralls which generates detailed stats. This is particularly useful for contributions: when someone submits a pull request, a Coveralls bot automatically replies with the updated coverage. This contributes to making code reviews easier and quicker.
Build
Babel
ES6+ has brought amazing features to JavaScript, but they’re still not supported everywhere. This doesn’t mean you must wait before you can start to use it: meet Babel.
Babel is a transpiler. It translates code into another language or another version of the same language. Your source code remains the same, but what the user gets is translated into another syntax to ensure it works in their environment. You get to use cutting-edge features, neat syntaxes and keep your source code clean, and you don’t have to worry about it working on old browsers.
I’ve written the entire Dinero.js source code using ES6 features, such as fat arrow functions and ES modules. Every time I release a version, Babel transpiles the source files into distributable ES5 code.
Babel also comes handy for unit testing. I’m using Node.js for that, which doesn’t natively support ES modules yet, thus can’t handle my source files. Thanks to Babel, I can transpile them on the fly every time I run my test command.
Rollup
Once your library is ready, you need to package it so it can be used by different people in different environments. Some will use it with Node. Some will need it directly in the browser as a script tag. Others will want it as an ES module to be included it in their own project and bundled with their own tools.
Rollup is a module bundler like Webpack or Parcel, but it’s particularly useful for building JavaScript libraries. It was designed to work with ES modules, and turn them into any module format you want.
Back in the days, the code we wrote was exactly the code that ended up in production. If you wanted your code to be as ubiquitous as possible, you’d wrap it into a UMD pattern by hand. Today, you can code exactly the way you want and ship different bundles for everyone, thanks to module bundlers like Rollup. Need a UMD version? There you go. Along with an AMD, a CJS, an IIFE, anything.
CI
GitHub
The most popular collaborative open source platform needs no introduction. GitHub is a wonderful product that fulfills everything developers can hope for and beyond. It hosts most of my projects. It hosts this blog. It connects with the best CI tools on the market. If you want to contribute to your favorite open source projects, build yourself a reputation and create the next best tools for other developers, look no further.
Travis CI
You can look at Travis CI as the conductor of your project’s build process.
Crafting a quality project is hard, and coding is only a small part of it. There are tasks to run in a certain order, at the right time, under the right circumstances. Here’s a list of all that needs to be done once I want to ship anything for Dinero.js:
- Run unit tests. If they pass:
- Run code coverage
- Build a version (dist files)
- Recompile the docs
- Tag a version and push the tag on GitHub
- Increment the version and push the build to npm
- Write an entry in the changelog
- Push the docs files to GitHub Pages
- Otherwise, fix things, rinse and repeat.
Before I installed my CI pipeline, I tried doing this by hand. Guess what? There hasn’t been a single time when I did it right. Why? Because as a typical human, I’m error-prone and subject to distractions. On the other hand, machines respond well to orders. They will do exactly what you want, how you want it. All you have to do is specify it well, once.
Travis CI is free for open-source projects and integrates well with third-party services. All you have to do is log in with your GitHub account and sync a project. By default, Travis will execute tests every time you push to your remote repository. Then, you can tell Travis what to do when tests pass with a .travis.yml file at the root of the project.
semantic-release
Before getting into what semantic-release does, you need to understand Semantic Versioning (aka “semver”).
In short, semver is a convention based on an X.Y.Z numeric format, respectively the MAJOR, the MINOR and the PATCH:
- When you fix a bug but your changes are backwards compatible, you increment the PATCH.
- When you add a feature but your changes are still backwards compatible, you increment the MINOR.
- When you make any kind of backwards incompatible changes, you increment the MAJOR.
This helps people who depend on your project know if they can safely upgrade, and simplifies dependency management in general.
Semantic Versioning is widely used in software development, but it can be hard to enforce. Again, we humans are error-prone and sentimental creatures. If you forget to take a commit into account, have a doubt on the nature of a change, or simply don’t understand semver quite yet, you can mislabel a new version. If you fix a small bug that slipped your attention just after releasing a new version, you might be tempted to sneak it in and act like nothing happened. This is where semantic-release comes into play.
In short, semantic-release takes care of versioning for you. You have no say in it. It uses your conventionally written commit messages to decide what the next version will be. Add it to your CI pipeline (in your Travis CI workflow, for example), and you get a fully automated system that will read your commits, change the version, tag it, push to GitHub, push to npm, and write your changelog. Phew.
Isn’t it a bit much?
This may look like a lot of things to set up. “Do I really need all this?”, you may wonder. I’ll reply with a few questions: how many tasks are you currently handling by hand? How much time does a release take you? How confident are you when you do it? When was the last time you performed your entire workflow without forgetting anything?
I personally can’t deploy a release by hand without a cheat sheet. Linting, formatting, testing, code coverage, docs, building, semantic versioning, releasing, updating the changelog, all in that order while making sure I’m on the right branch… ugh. Really hope I didn’t leave a typo! This process is so time-consuming, you can screw it up in so many ways, and it’s repeatedly taking you so much time from actual work, that automating it should be a no-brainer.
It looks tricky when you’re not used to it, but once you’ve built your workflow, all you have to do is maintain it. Update dependencies, keep an eye on innovative new tools, improve the process. You can even use a scaffolding tool to save your whole configuration and deploy ready-to-use project templates. Give it a try!
What about you? What’s your workflow for web projects? What has made your life easier? Come chat with me about it on Twitter!